In the long overdue part two of the OpenSMTPD configuration article, I’m going to focus on the configuration of the Backup MX servers.
Backup MX
For a reminder on how the Primary MX is configured and for the general overview of the whole system, please refer to Part 1 of this series.
As I mentioned before, the Backup MX configuration is much simpler than the Primary MX – we’re only using a small subset of the software compared to the Primary MX:
PFfor packet filtering and port redirection to spamdspamdrunning in default mode with greylisting enabledOpenSMTPDfor the actual SMTP service (working as MTA only)OpenBGPDfor instant black-list and white-list updates from the OpenBGPD project’s route-servers
The main difference between the Backup MX compared to the Primary MX is that the backup one is only used to accept email coming in from the outside world and sent to my local users. Specifically, we won’t need any functionality related to using this server to send outgoing email (i.e. the local users will never use this server to send their email out). Additionally, as this is only a Backup MX, we will only be storing email temporarily should there be an issue with the Primary MX, until the latter one comes back up. So in that regard, there’s no MSA nor MDA functionality implemented.
Following diagram shows the data flow for processing email on the Backup MX:
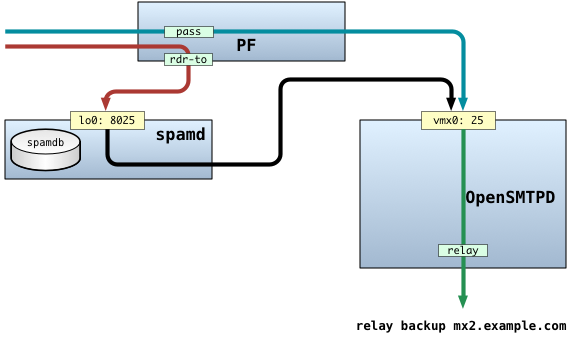
Accepting email for local domains (MTA)
The Backup MX doesn’t have a list of users on it – the actual users are only configured on the Primary MX. Because of that, the Backup MX is only concerned with the domains it needs to handle the incoming email for.
There is therefore really only one scenario we’re dealing with, and for that scenario, there are two possible paths email can take while being processed:
- The email comes to one of the three ports:
tcp/25,tcp/465ortcp/587and passes through the PF first. Depending on whether the source IP address of the sender is in the spamd’s whitelist, graylist or blacklist, it either goes directly to OpenSMTPD (in the first case) or is redirected by the PF to spamd, which listens on the loopback interface on porttcp/8025. This is possible because of a number of things:- spamd maintains two tables also configured as persistent in the PF, and these are
<spamd-white>and<spamd> - OpenBGPd maintains another pair of tables, also configured as persistent in PF, which are
<bgp_spamd_bypass>and<bgp_spamd> - finally, there’s an additional persistent table in the PF, called
<nospamd>, and which is used for manually whitelisting known good IP sources
- spamd maintains two tables also configured as persistent in the PF, and these are
- If the sender’s source IP is in the
<spamd>or<bgp_spamd>tables, or it’s not listed in any of the above tables, that email is redirected to spamd. Spamd will then either greylist (which means it will temporarily reject the email with a suitable SMTP error code to force the remote sender to send the email back and thus verify if the remote is an SMTP compliant application or a spamming script), blacklist (if it determined that the sender is definitely trying to send spam) or whitelist (place the sender in the whitelist in thespamdb, as well as updating the spamdb and the<spamd-white>table – this means upon next attempt, the email sent by this sender will pass through thepfstraight tosmtpdfor processing) - The next step is where the processing differs from that on the Primary MX:
- If the email is originating locally and destined to a local user,
smtpdwill simply put it into the users’s mailbox. This allows for email notifications fromcrondor other locally running daemons to be sent to system users. - For any other email, as long as it’s destined for one of the domains the MX serves, the
smtpdwill simply relay that email via the Primary MX.
- If the email is originating locally and destined to a local user,
Installation of required software packages
Unlike the Primary MX, all required software is already included with the core OS installation. The only software which is used for the backup MX is:
smtpdbgpdspamd
PF Configuration
#       $OpenBSD: pf.conf,v 1.54 2014/08/23 05:49:42 deraadt Exp $
#
# See pf.conf(5) and /etc/examples/pf.conf

# ----- DEFINITIONS -----

# Set the table limits to accommodate 200k entries for spamd-bgp
set limit table-entries 400000

# Reassemble fragments
set reassemble yes

# Return ICMP for dropped packets
set block-policy return

# Enable logging on egress interface
set loginterface egress

# Allow all on Loopback interface
set skip on lo

# States
KeepState = "keep state"
TcpState = "modulate state"

# spamd sources
spamd_sync = "{ 192.0.2.2, 203.0.113.2 }"

# Define ICMP message types to let in
icmp_types = "{ 0, 8, 3, 4, 11, 30 }"


# External interface
ext_if = "vmx0"

# Define tables for:
# - bruteforce sources
# - BGP spamd bypass
# - BGP spamd
# - nospamd sources (manual file with list of sources to pass directly to smtp)
table <bruteforce> persist
table <bgp_spamd_bypass> persist
table <bgp_spamd> persist
table <spamd-white> persist
table <spamd> persist
table <nospamd> persist file "/etc/mail/nospamd"

# ----- INBOUND RULES -----

# Scrub packets of weirdness
match in all scrub (no-df random-id max-mss 1440)

# Drop urpf-failed packets, add label uRPF
block in quick log from urpf-failed label uRPF
block quick log from <bruteforce>

# ICMP
pass in quick inet proto icmp icmp-type $icmp_types
pass in quick inet6 proto icmp6

# spamd sync
pass in quick inet proto udp from $spamd_sync to port spamd-sync

# EMAIL - SMTP
pass in quick log (to pflog1) on egress proto tcp \
        from { <bgp_spamd_bypass> <nospamd> <spamd-white> } \
        to (egress) port { smtp, submission, smtps } \
        flags S/SA $TcpState

pass in quick on egress inet proto tcp \
        from { <bgp_spamd> <spamd> } \
        to (egress) port { smtp, submission, smtps } \
        divert-to 127.0.0.1 port spamd

pass in quick on egress inet proto tcp \
        from any \
        to (egress) port { smtp, submission, smtps } \
        divert-to 127.0.0.1 port spamd

pass in quick on egress inet6 proto tcp \
        from any \
        to (egress) port { smtp, submission, smtps } \
        flags S/SA $TcpState


# ----- ALL OTHER TRAFFIC TO BE DROPPED -----

block in quick log on egress all


# ----- OUTBOUND TRAFFIC -----

pass out quick on egress proto tcp from any to any modulate state
pass out quick on egress proto udp from any to any keep state
pass out quick on egress proto icmp from any to any keep state
pass out quick on egress proto icmp6 from any to any keep state
The config above, again – similar to the config for the Primary MX in Part 1 of the series, is an actual although sanitised config from my backup MX server, with rules not relevant to the MX function removed. The config should be placed in the /etc/pf.conf Please note, that by default, OpenBSD’s PF evaluates rules top to bottom and for any packet matching multiple rules, the last one is going to be applied. While this is a perfectly valid mode of operation, I’m used to configuring firewalls where it’s the first match that is used, and therefore most if not all rules I have in my config use the word quick to implement that behaviour.
As you can see, this is a simplified version of the pf.conf file from the Primary MX. I will go through it below, however, to make it easier.
First, we configure global settings for PF like raising the limit of table entries to accommodate large BGP tables, enabling fragments reassembly, etc. Note that we also tell PF not to protect the loopback interface.
Then we configure the spamd_sync sources macro, which will expand to the IP addresses of mx1 and mx3. We’ll use this later, to enable the spam database synchronisation between the three Mail Exchangers.
Following that, we configure persistent PF tables, mentioned before. Note that the <spamd> table has to be called exactly that, as that name is hard-coded into spamd. Other tables to note are <bgp_spamd_bypass> and <bgp_spamd> whose names must match respective config statements for bgpd (more about that later) and <spamd-white> whose name must match the respective config in the spamd configuration file (again – more about that later).
After that, we’re scrubbing all incoming traffic of weird characteristics (e.g. drop all packets with illegal TCP flag combinations like SYN and RST; you can read more on the scrub feature in pf.conf(5) as well as in the excellent tutorial published on the OpenBSD PF FAQ page). In addition we drop traffic from sources to which our default route is not pointing via the interface such traffic came in on (this functionality is called uRFP or Unicast Reverse Path Forwarding) and also all traffic from sources which managed to get themselves added to the <bruteforce> table.
Following that there’s a pair of pass in statements which control the inbound ICMP traffic, and finally we get to the actual email related statements.
The first of those is the pass statement, allowing traffic from the other two MX servers to port spamd-sync (udp/8025). All three servers have their spamd configured to listen on this port, and to send the database updates to the other two servers. This pretty much works out of the box.
Following that, we have a set of four rules, similar to each other. These control access to ports smtp, smtps and submission (tcp 25, 465, 587). The main difference between them is whether the source IP is listed in:
- the
<bgp_spamd_bypass>,<nospamd>or<spamd-white>tables, in which case the traffic is simply allowed to connect to OpenSMTPd listening on the ports above, and which is handled by the first of the four statements - or in the
<bgp_spamd>or<spamd>tables, in which case the traffic will be redirected to the spamd listening on port tcp/8025, which is handled by the second statement using therdr-to 127.0.0.1 port spamdcommand - or the source IP is not listed in any table and its destination is port
tcp/25which means this is an email that’s being sent to a user on this server for delivery, in which case the third statement kicks in and redirects the traffic to spamd by default - or finally the source IP is not listed in any table but the traffic is sent to destination port
tcp/465ortcp/587, which means that this is someone trying to send an email through this server for delivery to a remote recipient, in which case we’re allowing the traffic to reach thesmtpddirectly, but we’re adding the bruteforce protection similar to the earlier statement.
Please note, the first line above is also logging to the pflog1 interface (using the pass in quick log (to pflog1) ... syntax). This is important as it’s used by spamlogd daemon, which is one of the spamd components, and which I will describe a little later.
The remaining lines are used to explicitly block all other inbound traffic as well as permit all outbound traffic. Note the modulate state and keep state statements at the end of those final four lines. As PF is a stateful firewall, these statements cause the PF to create a state entry for each traffic flow initiated from the server, so that the return traffic can pass through.
OpenSMTPD Configuration
The other major piece of configuration is for the smtpd service, stored in /etc/mail/smtpd.conf by default. Again, this configuration is a simpler version of the one needed for the Primary MX.
#       $OpenBSD: smtpd.conf,v 1.7 2014/03/12 18:21:34 tedu Exp $

egress_int = "vmx0"
ext_ipv4 = "198.51.100.2"
ext_ipv6 = "2001:db8:2::2"

# Enable queue compression and encryption
# (create key with 'openssl rand -hex 16')
queue compression
queue encryption key e4d75adbeb28fa73c5097cb5bc1dd808

# Define tables for:
# - domains
table aliases db:/etc/mail/aliases.db
table domains file:/etc/mail/domains

# Define SSL certificates for smtp.beautifulocean.org
# (in future also for mail.beautifulocean.org)
pki mx2.example.com certificate "/etc/ssl/mx2.example.com.crt"
pki mx2.example.com key "/etc/ssl/private/mx2.example.com.key"

max-message-size 50M
#
# INBOUND EMAIL CONFIGURATION
#

# Listen on SMTP on egress interface
listen on egress tls auth-optional
listen on egress smtps
listen on egress port submission tls-require

# Accept mail sent from local server to a local account
accept from local \
        for local \
        deliver to mbox

# (INBOUND) - start here
# untagged mail is sent to SpamAssassin
accept from any \
        for domain  \
        relay backup mx2.example.com
First, I’ve enabled both the queue compression as well as encryption. This means while email files are being stored in the spool directory waiting to be processed and delivered, they are compressed to save on disk space, and then encrypted to ensure privacy. This is a completely transparent process provided to you by OpenSMTPD out of the box. At the same time, it’s still possible for the root user to see the content of the queue for debugging by using the smtpctl show queue, smtpctl show envelope and smtpctl show message commands. For more info, check out the man for smtpctl(8).
Then, we’re defining tables which we will use later in the config. These will contain the aliases database (note the backend specified for this one is db), a list of domains for which we’re accepting email (plain text file containing one domain per line), a list of users for whom we’re accepting email, a table listing recipients we don’t want to receive email for (blacklist-recipients), and a table with a list of other relays for this domain, which we’re currently not using, but which I can show you how to use.
Following is a set of statements defining the certificate and key for SSL/TLS. In this example, the backup MX server uses a single hostname: mx2.example.com, so unlike in the Primaxy MX example, we don’t need the SNI functionality.
Then we configure the maximum message size – any email larger than that will be bounced. Please note, you should keep this value the same as for the Primary MX.
The following section, marked INBOUND EMAIL CONFIGURATION is where incoming email, sent to local domains, is processed. The first of the two accept statements allows email originated locally to be delivered locally. This is required for e.g. crond or other processes to send email notifications to local users.
The second accept statement below allows email from the outside world if the recipient is in one of the domains from the <domains> table. If so, that email will be relayed to the mail exchanger for the domain which has a lower priority in the DNS than the MX specified on the relay backup line. Please note, I’ve put mx2.example.com in here and it’s not a typo – we do want to put the hostname of the backup MX itself. On the mx3.example.com this statement might still have the mx2.example.com as the option, forcing the second backup MX to relay the message directly to the Primary.
Spamd configuration
spamd.conf
spamd configuration is identical to the one on the Primary MX. Just to recap: the main spamd configuration file is /etc/mail/spamd.conf. This config file is used by spamd-setup(8) which is a script that should run periodically on your system and which maintains the spamd database. On my system, this is what it looks like:
# $OpenBSD: spamd.conf,v 1.4 2012/05/14 16:58:46 beck Exp $
#
# spamd(8) configuration file, read by spamd-setup(8).
# See also spamd.conf(5).
#
# Configures lists for spamd(8).
#
# Strings follow getcap(3) convention escapes, other than you
# can have a bare colon (:) inside a quoted string and it
# will deal with it. See spamd-setup(8) for more details.
#
# "all" must be here, and defines the order in which lists are applied.
# Lists specified with the :white: capability apply to the previous
# list with a :black: capability.
#
# As of November 2004, a place to search for blacklists is
#     http://spamlinks.net/filter-bl.htm

all:\
    :bgp-spamd:spamd_whitelist:spamd_blacklist:

bgp-spamd:\
     :black:\
     :msg="Your address %A has sent mail to a spamtrap\n\
      within the last 24 hours":\
     :method=file:\
     :file=/etc/mail/bgp-blacklist.txt:

spamd_whitelist:\
    :white:\
    :method=file:\
    :file=/etc/mail/spamd-whitelist.txt:

spamd_blacklist:\
    :black:\
    :msg="Your address %A is in the manual blacklist.\n\
    Unless you know the user personally and know how to contact him\n\
    via other means, you're out of luck":\
    :method=file:\
    :file=/etc/mail/spamd-blacklist.txt:
Please see Part 1 and spamd.conf(5) for more details.
rc configuration
The spamd itself is configured using the runtime arguments. On my systems, I had to run the following to set it up:
mx2:~$ sudo rcctl enable spamd
mx2:~$ sudo rcctl set spamd flags -v -G 2:4:864 -Y 192.0.2.2 \
> -Y 203.0.113.2 -y 198.51.100.2 -K /etc/ssl/private/mx2.example.com.key \
> -C /etc/ssl/mx2.example.com.crt
mx2:~$ sudo rcctl start spamd
The flags above configure spamd to be verbose, modify greylisting parameters (so pass time is set to 2 minutes, grey list expiry for an IP address is set to 4 hours and white list expiry is set to 864 hours), make spamd listen for database sync updates on an interface which has IP address 198.51.100.2 (our egress interface), makes spamd send database sync updates to the other two MX servers, and configures the SSL certificate and key, so spamd can support SSL/TLS.
While the above starts spamd and initially configures it, we need to add a few more extra bits to make it work properly.
spamlogd configuration
Again, similarly as to the Primary MX, we need to enable spamlogd, which is used to sniff the traffic on a pflog interface and update the spamd WHITELIST database accordingly. Again, we will use the pflog1 interface for this.
Start by created the /etc/hostname.pflog1 file, containing:
up
description "spamlogd logging interface"
Then, manually bring that interface up, so we can test that everything is working:
mx2:~$ sudo ifconfig pflog1 up description "spamlogd logging interface"
And then configure and enable the spamlogd as follows:
mx2:~$ sudo rcctl enable spamlogd
mx2:~$ sudo rcctl set spamlogd flags -l pflog1
mx2:~$ sudo rcctl start spamlogd
This will start spamlogd which will listen on interface pflog1 and update the spamd database accordingly. There’s two more bits left to configure to complete the spamd setup – OpenBGPD and spamd-setup.
OpenBGPD setup
Again, the BGP configuration is pretty much exactly the same as in case of the Primary MX. As a reminder, following is the content of my /etc/bgpd.conf:
# $OpenBSD: bgpd.conf,v 1.1 2014/07/11 17:10:30 henning Exp $
# sample bgpd configuration file
# see bgpd.conf(5)

#macros
spam_rs1="64.142.121.62"    # rs.bgp-spamd.net
spam_rs2="217.31.80.170"    # eu.bgp-spamd.net
spamASN="65066"

AS 65500
fib-update no               # mandatory, to not update
                            # the local routing table

group "spam-bgp" {
    remote-as $spamASN
    multihop 64
    announce none           # Do not send any route updates
    neighbor $spam_rs1
    neighbor $spam_rs2
}

# 'match' is required, to remove entries when routes are withdrawn
match from group "spam-bgp" community $spamASN:42 set pftable "bgp_spamd_bypass"
match from group "spam-bgp" community $spamASN:666 set pftable "bgp_spamd"
spamd-setup
To keep the spamd in sync between all MX’s, we’ll use the same short bash script which we did on the Primary MX, which will be called from cron every 20 minutes or so, and which is saved to /usr/local/bin/bgp-spamd-update.sh:
#!/usr/local/bin/bash
#
#

ASN=65066
COMMUNITY=666

bgpctl show rib community ${ASN}:${COMMUNITY} | sed -e '1,4d' -e 's/\/.*$//' -e 's/[ \*\>]*//' > /etc/mail/bgp-blacklist.txt

/usr/libexec/spamd-setup

/usr/bin/logger -p mail.info -t spamd-update "spamd black list updated; bgp_spamd: $(/sbin/pfctl -t bgp_spamd -T show | /usr/bin/wc -l), bgp_spamd_bypass: $(/sbin/pfctl -t bgp_spamd_bypass -T show | /usr/bin/wc -l)"
Backup MX Setup Summary
This concludes the setup of the Backup Mail server mx2.example.com, as well as the documentation of how I set up my mail servers. If you’d like to run more than one Backup MX, the configuration will be identical with the exception of hostnames and IP addresses.
The above configuration, as well as the one documented in Part 1 of the series, should give you a robust setup for an email solution. Add to that a webmail client (an example of which could be the excellent Roundcube Mail, which is also available as a package from the OpenBSD package repositories) and you have a really nice setup!