I have been running my own email server for as long as I remember. I guess I don’t like to rely on third parties for my email, so options like Google’s GMail or Apple’s iCloud are really not for me. I have recently migrated my email from an old system to a new one, and I’d like to document the new setup while it’s still fresh in my mind and thus share my experience with the community.
General Overview
My old setup has aged quite significantly and the pain of its maintenance has been steadily on the increase over the last few years. To give you an idea, I was running a Sun Netra t1 with 512MB of RAM and a pair of 16GB hard drives running in a soft RAID configuration with Solaris 10 as an OS and a combination of Sendmail, SpamAssassin, ClamAV, OpenDKIM and Dovecot. While it was all running fine, at times the server was quite slow, plus keeping on top of the updates was becoming more and more of a problem. One weekend I decided to bite the bullet and deploy an all new solution. Please note, all information in this article is based on excellent OpenBSD FAQ and man pages, as well as a blog series written by Chess Griffin. Thanks guys for your help!
My actual setup consists of three servers: one primary mail server and two backup MX servers.
The primary server hosts the incoming email for myself and other users, plus it’s also used as an SMTP server for outgoing mail. As per the diagram below, it runs:
PFfor packet filtering and port redirection on incoming email to spamdspamdrunning in default mode, with greylisting enabled. This also includes runningspamlogdto listen to network traffic on apfloginterface to control greylisting.spampdandSpamAssassincombo for mail analysis and taggingOpenSMTPDfor the actual SMTP service (handling both the MTA as well as the MSA functions)Dovecotwith IMAP and LMTP services enabled for mail delivery to users mailboxes- For the MSA functions, I’m also running the
dkimproxyfor outbound mail to sign the email with the correct DKIM key. Note there’s no DKIM proxy running for the inbound email, as the DKIM is verified by SpamAssassin. OpenBGPDfor instant black-list and white-list updates from the project’s route servers
The backup servers are only used to queue email sent to my domains should the primary server become unreachable. In this article, the primary server will have a hostname mx1.example.com and its public interface will be configured with IP address 192.0.2.2/24 and IPv6 address 2001:db8:1::2/64. Backup MX servers are mx2.example.com [198.51.100.2/24, 2001:db8:2::2/64] and mx3.example.com [203.0.113.2/24, 2001:db8:3::2/64]. Their setup is a good bit simpler, as they’re running:
PFfor packet filtering and port redirection to spamd, similarly to the configuration on the primary serverspamdrunning in default mode with greylisting enabledOpenSMTPDfor the actual SMTP service, but working only really as an MTA.OpenBGPdfor instant black-list and white-list updates from the project’s route servers
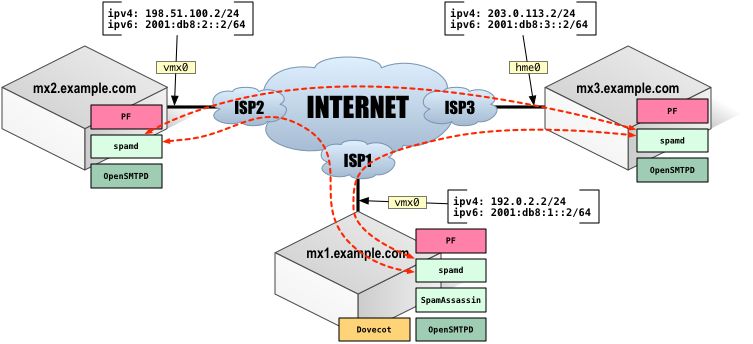
For completeness, my setup consists of two virtual machines: mx1.example.com and mx2.example.com as well as a physical server mx3.example.com. The virtual machines are hosted on VMware ESXi 6.0 (mx1) and ESXi 4.1U3 (mx2). The physical server is another Sun Netra t1 with 256MB of RAM and 16GB hard drive. mx1 and mx2 are running OpenBSD 5.7, while the mx3 is running OpenBSD 4.9 (due to me not having any out of band access to its console, and therefore not really being in a position where I can upgrade it without the risk of losing access to it). All three servers are in three separate physical locations (actually, three different countries) and use different Internet Service Providers. The spamd on each of the mail exchangers above (mx1, mx2 and mx3) is configured to synchronise the database. This means that if an external host tries to send email through one of my three MX’s, the other two will instantly have a suitable entry installed in their local spamdb’s and will handle the incoming connection correctly. This is depicted on the diagram above with a dotted red line.
Primary MX
The first thing I realised when configuring what was going to become the primary MX was that there are many ways to skin a cat. I’ve gone through the man pages as well as some online guides for setting things up and it all kind of made sense, but it still took me a while to fully understand the details of the configuration and what it is exactly that I wanted to have. I’ve finally come up with the following diagram which shows the data flow through the system for both incoming and outgoing mail.
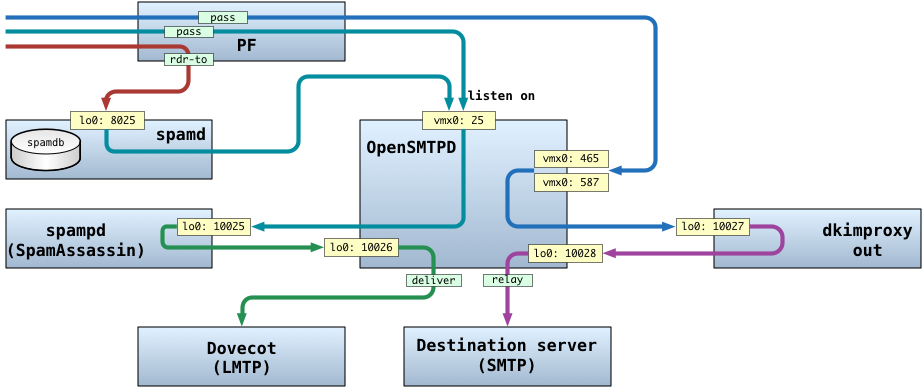
To understand what’s going on there, you need to start in the top-left corner of the diagram above. The three lines are three scenarios for an email to be processed by the server.
Sending email out to remote recipients (MSA)
The blue line is an email that is being submitted by a user to ports tcp/465 or tcp/587 for sending out to a remote recipient. Please note, when I say a local user, I mean a user who has an email account on my server. Here’s what happens with that email:
- The TCP session first goes through the PF, which allows the traffic to pass to ports
tcp/465andtcp/587. - OpenSMTPD is configured to listen on the two ports above and to use SSL and TLS. The user must also authenticate to be allowed to submit an email for sending.
- After the user authenticates successfully and his email is submitted for sending, it is then forwarded to
localhost, porttcp/10027(using therelay via smtp://127.0.0.1:10027statement) to the dkimproxy_out daemon, which adds the correct DKIM key and forwards it back to OpenSMTPD to localhost, porttcp/10028. - OpenSMTPD is configured to also listen on the
loopbackinterface, on porttcp/10028and tag all traffic coming in this way with aDKIM_OUTtag. - Finally, all email tagged with the
DKIM_OUTtag is relayed out to the remote recipients.
Accepting email for local users (MTA)
The other scenario is for accepting email from the outside world sent in to the local users. There are two paths depicted on the diagram above, one starting with a teal line in the middle and the other one with the red line at the bottom of the three possible “ways in”.
- The email comes in to port
tcp/25and passes through the PF first. Depending on whether the source IP address of the sender is in the spamd’s whitelist, graylist or blacklist, it either goes directly to OpenSMTPD (in the first case) or is redirected by the PF to spamd, which listens on the loopback interface on porttcp/8025. This is possible because of a number of things:- spamd maintains two tables also configured as persistent in the PF, and these are
<spamd-white>and<spamd> - OpenBGPd maintains another pair of tables, also configured as persistent in PF, which are
<bgp_spamd_bypass>and<bgp_spamd> - finally, there’s an additional persistent table in the PF, called
<nospamd>, and which is used for manually whitelisting known good IP sources
- spamd maintains two tables also configured as persistent in the PF, and these are
- If the sender’s source IP is in the
<spamd>or<bgp_spamd>tables, or it’s not listed in any of the above tables, that email is redirected to spamd. Spamd is then either greylisting (which means it will temporarily reject the email with a suitable SMTP error code to force the remote sender to send the email back and thus verify if the remote is an SMTP compliant application or a spamming script), blacklist (if it determined that the sender is definitely trying to send spam) or whitelist (place the sender in the whitelist in thespamdb, as well as updating the spamdb and the<spamd-white>table – this means upon next attempt, the email sent by this sender will pass through thepfstraight tosmtpdfor processing) - In the next step, the email is then forwarded to
localhost, porttcp/10025to spampd, which handles sending it to SpamAssassin for filtering and classification. On completion, the email is forwarded back to OpenSMTPD, tolocalhost, porttcp/10026 - OpenSMTPD is configured to listen on loopback interface port
tcp/10026and to tag incoming email on this interface withSPAM_IN. All email with this tag is then accepted for delivery via Dovecot’s LMTP, provided it is sent to one of the domains listed in the<domains>table and to one of the virtual users listed in the<users>table (note both conditions need to be simultaneously met – more on that later), or that the recipient is listed in the<aliases>table. - Finally, the email is delivered to the users mailbox using Dovecot’s LMTP process.
Installation of required software packages
At the time of writing, the current version of OpenBSD is 5.7. I have only used what’s available in the official packages for setting up my email servers.
Before we configure anything, we need to install the following:
- dkimproxy
- dovecot
- p5-Mail-Spamassassin
- spampd
The following, although not strictly required, are also useful (and in fact, this article assumes those packages have also been installed):
- bash
- curl
To install these, make sure you either have a /etc/pkg.conf file with a valid installpath or that the PKG_PATH environmental variable is set with the path to the installation source, and then run the pkg_add -iv PACKAGE command, where PACKAGE is substituted with the package name from the lists above.
PF Configuration
As described above, everything starts with the PF. The primary function of the PF is to protect the server from unwanted traffic, however we’re also using its powerful features to send the inbound email to spamd, or directly to smtpd, depending on which table the sender’s IP is listed in.
#
# See pf.conf(5) and /etc/examples/pf.conf

# ----- DEFINITIONS -----

# Set the table limits to accommodate 200k entries for spamd-bgp
set limit table-entries 400000

# Reassemble fragments
set reassemble yes

# Return ICMP for dropped packets
set block-policy return

# Enable logging on egress interface
set loginterface egress

# Allow all on Loopback interface
set skip on lo

# spamd sources
spamd_sync = "{ 198.51.100.2, 203.0.113.2 }"

# Define ICMP message types to let in
icmp_types = "{ 0, 8, 3, 4, 11, 30 }"

# Define tables for:
# - bruteforce sources
# - bgp_spamd_bypass: SMTP connections coming from these IPs bypass spamd
# - bgp_spamd: SMTP connections coming from these IPs are blacklisted
# - spamd: maintained by spamd, used for greylisting
# - spamd-white: maintained by spamd, used for whitelisting
# - nospamd sources (manual file with list of sources to pass directly to smtp)
table <bruteforce> persist
table <bgp_spamd_bypass> persist
table <bgp_spamd> persist
table <spamd-white> persist
table <spamd> persist # updated by spamd-setup
table <nospamd> persist file "/etc/mail/nospamd"

# ----- INBOUND RULES -----
# Scrub packets of weirdness
match in all scrub (no-df random-id max-mss 1440)

# Drop urpf-failed packets, add label uRPF
block in quick log from urpf-failed label uRPF
block quick log from <bruteforce>

# ICMP
pass in quick inet proto icmp icmp-type $icmp_types
pass in quick inet6 proto icmp6

# spamd sync
pass in quick inet proto udp from $spamd_sync to port spamd-sync

# EMAIL - IMAP, POP3

pass in quick on egress proto tcp from any \
    to (egress) port { imap, imaps, pop3, pop3s } \
    flags S/SA modulate state \
    (max-src-conn 50, max-src-conn-rate 50/5, overload <bruteforce> flush global)

# EMAIL - SMTP

pass in quick log (to pflog1) on egress proto tcp \
    from { <bgp_spamd_bypass> <nospamd> <spamd-white> } \
    to (egress) port { smtp } \
    flags S/SA modulate state

pass in quick proto tcp from { <bgp_spamd> <spamd> } \
    to (egress) port { smtp, submission, smtps } \
    rdr-to 127.0.0.1 port spamd

pass in quick proto tcp from any \
    to (egress) port { smtp } \
    rdr-to 127.0.0.1 port spamd

pass in quick proto tcp from any \
    to (egress) port { submission, smtps } \
    flags S/SA modulate state \
    (max-src-conn 50, max-src-conn-rate 25/5, overload <bruteforce> flush global)

# the rule below is to exempt any MTA that we send email to from spamd
# to ensure replies to our local users are delivered immediately
pass out quick log (to pflog1) on egress proto tcp to any port smtp

# ----- ALL OTHER TRAFFIC TO BE DROPPED -----

block in quick log on egress all

# ----- OUTBOUND TRAFFIC -----

pass out quick on egress proto tcp from any to any modulate state
pass out quick on egress proto udp from any to any keep state
pass out quick on egress proto icmp from any to any keep state
pass out quick on egress proto icmp6 from any to any keep state
The config above is an actual PF configuration file from my host, although sanitised and with some rules not relevant to this article removed. This config is placed in /etc/pf.conf. Please note, that by default, OpenBSD’s PF evaluates rules top to bottom and for any packet matching multiple rules, the last one is going to be applied. While this is a perfectly valid mode of operation, I’m used to configuring firewalls where it’s the first match that is used, and therefore most if not all rules I have in my config use the word quick to implement that behaviour.
First, we configure global settings for PF like raising the limit of table entries to accommodate large BGP tables, enabling fragments reassembly, etc. Note that we also tell PF not to protect the loopback interface. (lines 1-20).
Then (line 22) we configure the spamd_sync sources macro, which will expand to the IP addresses of mx2 and mx3. We’ll use this later, to enable the spam database synchronisation between the three Mail Exchangers.
Following that (lines 28-40), we configure persistent PF tables, mentioned before. Note that the <spamd> table has to be called exactly that, as that name is hard-coded into spamd. Other tables to note are <bgp_spamd_bypass> and <bgp_spamd> whose names must match respective config statements for bgpd (more about that later) and <spamd-white> whose name must match the respective config in the spamd configuration file (again – more about that later).
After that, we’re scrubbing all incoming traffic of weird characteristics (e.g. drop all packets with illegal TCP flag combinations like SYN and RST; you can read more on the scrub feature in pf.conf(5) as well as in the excellent tutorial published on the OpenBSD PF FAQ page). In addition we drop traffic from sources to which our default route is not pointing via the interface such traffic came in on (this functionality is called uRFP or Unicast Reverse Path Forwarding) and also all traffic from sources which managed to get themselves added to the <bruteforce> table. (lines 42-48).
Following that there’s a pair of pass in statements (lines 51, 52) which control the inbound ICMP traffic, and finally we get to the actual email related statements.
The first of those is the pass statement in line 55, allowing traffic from the other two MX servers to port spamd-sync (udp/8025). All three servers have their spamd configured to listen on this port, and to send the database updates to the other two servers. This pretty much works out of the box.
In lines 59-62, we have a multi-line statement that allows inbound traffic in to Dovecot, to ports for imap, imaps, pop3 and pop3s (tcp 143, 993, 110, 995 respectively) and . Note that we’re only allowing packets with TCP SYN and TCP SYN/ACK flags set (i.e. only packets that properly establish the TCP session). Once the TCP session is established, the modulate state statement “kicks in” and lets the remaining packets from the current flow in as well. Finally, the last part of this statement controls thresholds for number of sessions as well as the rate at which sessions are established from the same source IP, and when those are exceeded that IP is added to the <bruteforce> table and all other states matching this source IP are killed as well, as we now think this IP is trying to compromise our server. Remember – this is where the earlier rule which drops traffic from sources listed in the <bruteforce> comes into play.
Following that, we have a set of four rules, similar to each other, on lines 66-82. These control access to ports smtp, smtps and submission (tcp 25, 465, 587). The main difference between them is whether the source IP is listed in:
- the
<bgp_spamd_bypass>,<nospamd>or<spamd-white>tables, in which case the traffic is simply allowed to connect to OpenSMTPd listening on the ports above, and which is handled by the first of the four statements - or in the
<bgp_spamd>or<spamd>tables, in which case the traffic will be redirected to the spamd listening on port tcp/8025, which is handled by the second statement using therdr-to 127.0.0.1 port spamdcommand - or the source IP is not listed in any table and its destination is port
tcp/25which means this is an email that’s being sent to a user on this server for delivery, in which case the third statement kicks in and redirects the traffic to spamd by default - or finally the source IP is not listed in any table but the traffic is sent to destination port
tcp/465ortcp/587, which means that this is someone trying to send an email through this server for delivery to a remote recipient, in which case we’re allowing the traffic to reach thesmtpddirectly, but we’re adding the bruteforce protection similar to the earlier statement.
Please note, the first line above are also logging to the pflog1 interface (using the pass in quick log (to pflog1) ... syntax). This is important as it’s used by spamlogd daemon, which is one of the spamd components, and which I will describe a little later.
Finally we also add an explicit statement for traffic going out to a remote destination to port tcp/25, logging it to the pflog1 interface (line 86) – again, this is used by the spamlogd to whitelist remote servers we’re making contact with, to avoid them being greylisted when the recipient responds to the email sent from us.
The remaining lines are used to explicitly block all other inbound traffic (line 90) as well as permit all outbound traffic. Note the modulate state and keep state statements at the end of those final four lines. As PF is a stateful firewall, these statements cause the PF to create a state entry for each traffic flow initiated from the server, so that the return traffic can pass through.
OpenSMTPD Configuration
The next major piece of the puzzle is the smtpd configuration, stored in /etc/mail/smtpd.conf. This one did take me a while to crack as it’s much different to what I was used to running sendmail before, but now that I have gone through the learning curve, I really appreciate the simplicity, beauty and the power of the OpenSMTPD.
# Enable queue compression and encryption
# (create key with 'openssl rand -hex 16')
queue compression
queue encryption key 24443e7a4056df59c76f9235c2360cf3

# Define tables for:
# - aliases
# - domains
# - users
# - blacklist recipients
table aliases db:/etc/mail/aliases.db
table domains file:/etc/mail/domains
table users file:/etc/mail/users
table blacklist-recipients file:/etc/mail/blacklist-recipients
table other-relays file:/etc/mail/other-relays

# Define SSL certificates for host names
pki smtp.example.com certificate "/etc/ssl/smtp.example.com.crt"
pki smtp.example.com key "/etc/ssl/private/smtp.example.com.key"

pki mail.example.com certificate "/etc/ssl/mail.example.com.crt"
pki mail.example.com key "/etc/ssl/private/mail.example.com.key"

pki mx.example.com certificate "/etc/ssl/mx.example.com.crt"
pki mx.example.com key "/etc/ssl/private/mx.example.com.key"

max-message-size 50M

#
# INBOUND EMAIL CONFIGURATION
#

# Listen on SMTP, SMTPS, SUBMISSION in on egress interface
listen on egress tls auth-optional          # MTA
listen on egress smtps auth             # MSA (auth required)
listen on egress port submission tls-require auth   # MSA (auth required)

# Listen in on loopback interface
# This is where spampd will relay email to after parsing
# - port 10026
# - tag SPAM_IN
# - server name: smtp.example.com
listen on lo0 port 10026 tag SPAM_IN

# Accept mail sent from local server to a local account
accept from local \
    for local \
    deliver to lmtp "/var/dovecot/lmtp"

# tagged and returned from spampd, deliver to mbox
accept tagged SPAM_IN \
    for domain <domains> virtual <users> \
    deliver to lmtp "/var/dovecot/lmtp"

accept tagged SPAM_IN \
    for local alias <aliases> \
    deliver to lmtp "/var/dovecot/lmtp"

#
# (INBOUND) START HERE
#

# untagged mail is sent to SpamAssassin
accept from any \
    recipient ! <blacklist-recipients> \
    for domain <domains> \
    relay via smtp://127.0.0.1:10025    # send to spampd

#
# OUTBOUND EMAIL CONFIGURATION
#

# Listen on SMTP on loopback interface
# - server name: smtp.example.com

listen on lo0

# Listen in on loopback interface
# - port 10028
# - tag DKIM_OUT
# - server name: smtp.example.com

listen on lo0 port 10028 tag DKIM_OUT

# Accept mail tagged DKIM-OUT (from dkimproxy_out)
# - for any
# - relay
# - server hostname smtp.example.com

accept tagged DKIM_OUT \
    for any \
    relay \
    hostname smtp.example.com

#
# (OUTBOUND) START HERE
#

# Accept mail from local
# - for any
# - relay via smtp://127.0.0.1:10027
#   (send to dkimproxy_out)

accept from local \
    for any \
    relay via smtp://127.0.0.1:10027
First, in lines 1-4, I’ve enabled both the queue compression as well as encryption. This means while email files are being stored in the spool directory waiting to be processed and delivered, they are compressed to save on disk space, and then encrypted to ensure privacy. This is a completely transparent process provided to you by OpenSMTPD out of the box. At the same time, it’s still possible for the root user to see the content of the queue for debugging by using the smtpctl show queue, smtpctl show envelope and smtpctl show message commands. For more info, check out the man for smtpctl(8).
Then, in lines 6-15, we’re defining tables which we will use later in the config. These will contain the aliases database (note the backend specified for this one is db), a list of domains for which we’re accepting email (plain text file containing one domain per line), a list of users for whom we’re accepting email, a table listing recipients we don’t want to receive email for (blacklist-recipients), and a table with a list of other relays for this domain, which we’re currently not using, but which I can show you how to use.
Following is a set of statements defining the certificates and keys for SSL/TLS (lines 17-25). In this example, the primary MX server has three different hostnames: mx1.example.com, smtp.example.com and mail.example.com. OpenSMTPD supports SNI (Server Name Indication) which is a TLS extension allowing the client to specify the hostname to which it’s trying to connect during the TLS negotiation, and which allows the server to present the correct certificate (which means, it’s possible to have multiple SSL certificates on the same IP address and TCP port).
Then in line 27 we configure the maximum message size – any email larger than that will be bounced.
The following section, marked INBOUND EMAIL CONFIGURATION is where incoming email, sent to local users, is processed. I have specified three listen statements. The first one is meant to be used for accepting email coming from remote senders. It will cause OpenSMTPD to bind to port tcp/25 to an egress interface, which is another way of saying the interface via which our default gateway is reachable. This rule also specifies that TLS is to be supported (although it’s optional), and that optionally we also support user authentication.
The second listen statement binds to port tcp/465 and enables SSL. It also requires the user to authenticate before it accepts any other commands.
Finally the last listen statement binds to port tcp/587, specifies that TLS is required and that user authentication is also required before any other command is accepted.
For the next rules, it is important to note, that in the smtpd.conf the first matching rule is going to kick in, and none of the following rules will be evaluated – you need to remember this when setting up rules.
Because of that, I’ve put more specific rules first, and less specific rules to follow. To properly read this config, you need to start at lines 59-61 (marked (INBOUND) START HERE) and read the rule immediately below (line 64). In that rule, we’re accepting email sent in from anywhere, whose recipient is not in the <blacklist-recipients> table if the domain which the email was sent to is listed in the <domains> table. If those conditions are met, we then send this email to spampd, which is the daemon communicating with SpamAssassin, and which has been configured to listen on the loopback interface, on port tcp/10025. This is done using the relay via smtp://127.0.0.1:10025 statement and is possible as spampd can actually talk SMTP.
The reason why this is the least specific rule is that the traffic is not tagged with any tag. All other traffic is tagged, depending on where it comes from (as we’ll see below).
In the next step, SpamAssassin filters the email and passes it back to spampd which relays it back to OpenSMTPD, this time to 127.0.0.1:10026. And here’s where the next rule kicks in (line 43). The listen on lo0 port 10026 tag SPAM_IN rule does exactly that – every email that arrives on port tcp/10026 on lo0 will be tagged with the SPAM_IN tag. We can then match on tags in subsequent rules, as we do in rules starting on lines 51 and 55.
The first of those two rules, matches email tagged with SPAM_IN, which is sent to one of the domains from <domains> table and whose recipient is listed in the <users> table. All emails matching this rule will be delivered to the users inbox using LMTP, specifically Dovecot’s lmtp daemon.
If the email didn’t match the first rule, the second one is evaluated. This rule is very similar to the one above, except it checks if the email was sent to a recipient listed in the local <aliases> table – if it matches, the email will be delivered to inbox via LMTP.
Finally, one special case is covered by the rule at line 46, which is to accept email that was originated locally, and whose recipient is also a local user. Such email will also be delivered to inbox using LMTP. This one took me a while to figure out (although now that I have it in there it makes a lot of sense). I was used to sendmail delivering email to local accounts by default – in OpenSMTPD you need to specify all rules explicitly, which is in line with the whole philosophy of the OS. It is also worth mentioning here, that any authenticated user will be considered local by OpenSMTPD, and therefore will match rules which accept from local.
The next section of the config, marked OUTBOUND EMAIL CONFIGURATION deals with email submitted by local users for delivery to remote recipients. Similarly as above, I’ve put the rules with the least specific at the bottom, and more specific at the top of this section.
We start with line 76, which binds OpenSMTPD to the lo0 interface (which by default listens on port tcp.25).
Then we look at the bottom of the config (lines 95-106), where there’s a rule that accepts all traffic from local, with the destination set to anywhere and which relays via SMTP to 127.0.0.1, port tcp/10027. This is where the dkimproxy_out is configured to listen to, so that all outbound email has a proper DKIM signature inserted into headers. As this is the least specific rule for outbound email, it will get matched first.
Then in line 83, we also bind OpenSMTPD to interface and port lo0, tcp/10028 and tag all traffic that comes in through this interface/port with DKIM_OUT.
And finally, the rule on line 90 matches on all email that is tagged with DKIM_OUT, with destination anywhere, and relays it out setting the source hostname to smtp.example.com.
Spamd configuration
spamd.conf
The main spamd configuration file is /etc/mail/spamd.conf. This config file is used by spamd-setup(8) which is a script that should run periodically on your system and which maintains the spamd database. On my system, this is what it looks like:
# $OpenBSD: spamd.conf,v 1.4 2012/05/14 16:58:46 beck Exp $
#
# spamd(8) configuration file, read by spamd-setup(8).
# See also spamd.conf(5).
#
# Configures lists for spamd(8).
#
# Strings follow getcap(3) convention escapes, other than you
# can have a bare colon (:) inside a quoted string and it
# will deal with it. See spamd-setup(8) for more details.
#
# "all" must be here, and defines the order in which lists are applied.
# Lists specified with the :white: capability apply to the previous
# list with a :black: capability.
#
# As of November 2004, a place to search for blacklists is
#     http://spamlinks.net/filter-bl.htm

all:\
    :bgp-spamd:spamd_whitelist:spamd_blacklist:

bgp-spamd:\
     :black:\
     :msg="Your address %A has sent mail to a spamtrap\n\
      within the last 24 hours":\
     :method=file:\
     :file=/etc/mail/bgp-blacklist.txt:

spamd_whitelist:\
    :white:\
    :method=file:\
    :file=/etc/mail/spamd-whitelist.txt:

spamd_blacklist:\
    :black:\
    :msg="Your address %A is in the manual blacklist.\n\
    Unless you know the user personally and know how to contact him\n\
    via other means, you're out of luck":\
    :method=file:\
    :file=/etc/mail/spamd-blacklist.txt:
The first line, starting with the keyword all sets the order in which lists are evaluated. Please note, the order of the list is important, as where a blacklist is followed by a whitelist, if both contain an IP address, it will be removed from the final spamd whitelist. In an example above, if all three lists contained the same IP address, it would first be blacklisted (by bgp-spamd), then removed from the blacklist, but then added back in again.
As I’m using BGP for instant blacklist and whitelist propagation, I have removed the uatraps and nixspam lists out of the default configuration file, as I believe the BGP feeds contain the same IP addresses.
I have also added a bgp-spamd section as well as two entries for manual blacklist and manual whitelist (called spamd_blacklist and spamd_whitelist, respectively).
Please see spamd.conf(5) for more details.
rc configuration
The spamd itself is configured using the runtime arguments. On my systems, I had to run the following to set it up:
mx1:~$ sudo rcctl enable spamd
mx1:~$ sudo rcctl set spamd flags -v -G 2:4:864 -Y 198.51.100.2 \
> -Y 203.0.113.2 -y 192.0.2.2 -K /etc/ssl/private/smtp.example.com.key \
> -C /etc/ssl/smtp.example.com.crt
mx1:~$ sudo rcctl start spamd
The flags above configure spamd to be verbose, modify greylisting parameters (so pass time is set to 2 minutes, grey list expiry for an IP address is set to 4 hours and white list expiry is set to 864 hours), make spamd listen for database sync updates on an interface which has IP address 192.0.2.2 (our egress interface), makes spamd send database sync updates to the other two MX servers, and configures the SSL certificate and key, so spamd can support SSL/TLS.
While the above starts spamd and initially configures it, we need to add a few more extra bits to make it work properly.
spamlogd configuration
The other daemon that we need to enable is spamlogd, which is used to sniff the traffic on a pflog interface and update the spamd database accordingly. Please note, the spamd uses spamlogd to update its WHITELIST database only – therefore we only need to log the legitimate traffic to pflog1.
For this purpose, and to log the SMTP related traffic on a separate interface than the normal PF rules violations, I’ve configured the pflog1 interface on my system. You might remember, in the pf.conf file above we configured one SMTP rule to log to this interface – exactly for this reason.
Start by created the /etc/hostname.pflog1 file, containing:
up
description "spamlogd logging interface"
This will make sure that each time the system is rebooted, the pflog1 interface will be brought up. We need to also manually bring that interface up this time, so we can test that everything is working:
mx1:~$ sudo ifconfig pflog1 up description "spamlogd logging interface"
And then configure and enable the spamlogd as follows:
mx1:~$ sudo rcctl enable spamlogd
mx1:~$ sudo rcctl set spamlogd flags -l pflog1
mx1:~$ sudo rcctl start spamlogd
This will start spamlogd which will listen on interface pflog1 and update the spamd database accordingly. There’s two more bits left to configure to complete the spamd setup – OpenBGPD and spamd-setup.
OpenBGPD setup
BGP is a routing protocol used by Internet Service Providers. It’s highly scalable, able to keep millions of records in the BGP tables, and it’s what Internet routers use to build their routing tables. It’s also very flexible and can be used for a number of clever things, one of which is what the bgp-spamd project, run by Peter Hessler, is doing – propagating IP addresses which are a confirmed source of spam (blacklist), as well as a list of IP addresses which are a confirmed source of clean email (whitelist). The beauty of BGP versus other means of distributing the black and white lists is that after initial increased load while the BGP session is being set up and the BGP tables are exchanged, further updates generate very little load and are instantaneous – therefore our blacklist and whitelist can be updated pretty much in real time!
The support for BGP protocol is implemented using OpenBGPD‘s daemon – bgpd.
Following is the content of my /etc/bgpd.conf:
# $OpenBSD: bgpd.conf,v 1.1 2014/07/11 17:10:30 henning Exp $
# sample bgpd configuration file
# see bgpd.conf(5)

#macros
spam_rs1="64.142.121.62"    # rs.bgp-spamd.net
spam_rs2="217.31.80.170"    # eu.bgp-spamd.net
spamASN="65066"

AS 65500
fib-update no               # mandatory, to not update
                            # the local routing table

group "spam-bgp" {
    remote-as $spamASN
    multihop 64
    announce none           # Do not send any route updates
    neighbor $spam_rs1
    neighbor $spam_rs2
}

# 'match' is required, to remove entries when routes are withdrawn
match from group "spam-bgp" community $spamASN:42 set pftable "bgp_spamd_bypass"
match from group "spam-bgp" community $spamASN:666 set pftable "bgp_spamd"
It’s a really simple config, with only one “magic” bit.
We start with defining three macros: two for the OpenBGPD Team’s route servers (spam_rs1 and spam_rs2) which is where we’re going to establish the BGP sessions to, and the third one is just a label for the OpenBGPD’s Autonomous System Number (spamASN).
AS Numbers are what BGP uses to group IP prefixes into – typically, an Internet Service Provider will have a number of IPv4 and IPv6 ranges (called prefixes), and a single AS Number which all these IPv4/IPv6 addresses are grouped within. BGP routers then calculate a path to the destination IP by looking at which AS Numbers the prefix is visible behind – this is called AS-Path.
We then need to define our own AS Number – I’ve set mine to 65500, which is in the private AS Number range (65413 – 65535). Unless your organisation has been assigned a public AS Number, you should too.
We then have an important and mandatory option for this config, which is to disable updating the system’s routing table with the information in the BGP table (fib-update no). This is important as even though we’re using what has been designed as a routing protocol, we’re using it for a whole different reason and therefore we don’t want the BGP to modify your server’s routing table.
Then in lines 14-21, we configure the actual BGP sessions to the two Route Servers, making sure we’re not advertising any routes back to them.
Finally, the last two lines, are where the magic happens. Line 24 matches all prefixes which come from the above Route Servers, and which have their BGP Community (which is an extended attribute you can think of somewhat like a “colour”) set to 65066:42 and adds them to the PF's <bgp_spamd_bypass> table. Similarly, the last line (25) does a similar thing for prefixes marked with BGP Community 65066:666 and adds them to the <bgp_spamd> table. Again – if you remember, we have configured those two tables in /etc/pf.conf above as persistent tables, and use them to decide where to send the traffic based on which IP address it came from (and whether the IP address was black- or whitelisted).
Any BGP table update will be propagated immediately to the PF config – kind of neat, isn’t it?
spamd-setup
Finally, we need to make sure our spamd database is kept in sync and up to date with all those changes as well. To do that, I’ve written a really short bash script, which I call from cron every 20 minutes or so, and which is saved to /usr/local/bin/bgp-spamd-update.sh:
#!/usr/local/bin/bash
#
#

ASN=65066
COMMUNITY=666

bgpctl show rib community ${ASN}:${COMMUNITY} | sed -e '1,4d' -e 's/\/.*$//' -e 's/[ \*\>]*//' > /etc/mail/bgp-blacklist.txt

/usr/libexec/spamd-setup

/usr/bin/logger -p mail.info -t spamd-update "spamd black list updated; bgp_spamd: $(/sbin/pfctl -t bgp_spamd -T show | /usr/bin/wc -l), bgp_spamd_bypass: $(/sbin/pfctl -t bgp_spamd_bypass -T show | /usr/bin/wc -l)"
What this does is it saves the list of IP addresses in the BGP table which are marked with 65066:666 community into the /etc/mail/bgp-blacklist.txt, and then runs the /usr/libexec/spamd-setup which uses that file, as well as the other ones we configured earlier in spamd.conf to populate the spamd database.
The final line is just a message that’s logged via syslog, and which logs how many prefixes we have in the bgp_spamd and bgp_spamd_bypass tables.
There’s one more thing to configure to finish handling the incoming email: SpamAssassin.
SpamAssassin and spampd configuration
Similarly to the other daemons, first we need to enable both SpamAssassin and spampd and configure their run time arguments:
mx1:~$ sudo rcctl enable spamassassin
mx1:~$ sudo rcctl start spamassassin
mx1:~$ sudo rcctl enable spampd
mx1:~$ sudo rcctl set spampd flags "--port=10025 --relayhost=127.0.0.1:10026 --tagall --aw --rh --maxsize=256 -pid=/var/spampd/spampd.pid"
mx1:~$ sudo rcctl start spampd
We’ll just use the default settings for SpamAssassin here, as fine tuning its rules is beyond the scope of this article. I would strongly suggest you look at features like Auto Whitelists or Bayesian filter, as well as enabling some of the extra modules.
Note the configuration of spampd in line 4 above – we’re telling it to bind to port tcp/10025 and to relay messages that SpamAssassin is done with to 127.0.0.1:10026. Again – if you remember, we have a section in /etc/smtpd.conf which makes OpenSMTPD listen to port tcp/10026 on lo0 interface and tag all email coming in this way with the SPAM_IN tag – this is the other “end” of that connection.
Now that we have all bits in place for handling incoming email, there’s one more thing we need to configure for sending email out – the DKIM Proxy.
DKIM Proxy configuration
First we need to edit the configuration file, which should be at /etc/dkimproxy_out.conf:
# specify what address/port DKIMproxy should listen on
listen    127.0.0.1:10027

# specify what address/port DKIMproxy forwards mail to
relay     127.0.0.1:10028

# specify what domains DKIMproxy can sign for (comma-separated, no spaces)
domain    example.com

# specify what signatures to add
signature dkim(c=relaxed)
signature domainkeys(c=nofws)

# specify location of the private key
keyfile   /var/dkimproxy/default.private

# specify the selector (i.e. the name of the key record put in DNS)
selector  default

# control how many processes DKIMproxy uses
#  - more information on these options (and others) can be found by
#    running `perldoc Net::Server::PreFork'.
#min_servers 5
#min_spare_servers 2
As you can see from the file above, the dkimproxy_out is listening on port tcp/10027 for emails sent from OpenSMTPD, and once those are DKIM signed, it’s relaying them back to OpenSMTPD to 127.0.0.1:10028. Recall the corresponding settings in the /etc/smtpd.conf above and now you have a full picture of what’s going on there.
The next step is to generate the key which the DKIM Proxy should use to sign outgoing email. Please note, if you’re migrating from another setup and you already have a key, you may be able to use it instead.
To generate the key, run the following command:
mx1:~$ sudo dkim-genkey
This will create two files in /var/dkimproxy: default.private and default.txt.
The default.private contains the private key used for email signing, and you want to keep this key private.
The default.txt contains the DNS record you need to add to your zone configuration file for each domain you have (in the case of this document we’re only using one domain, example.com). What you do is literally copy and paste the content of this file into your zone configuration file. The DNS configuration is out of scope of this article, but a quick Google search will point you in the right direction.
Note, that both the default configuration file for dkimproxy_out, as well as dkim-genkey assume that your key selector (i.e. a label or a name) is going to be set to default – if you’d like to change it, make a suitable change in /etc/dkimproxy_out.conf (line 18, after the selector statement) as well as in the default.txt file and the DNS zone configuration file, as all of these need to match. Also, it would be a good idea to rename the two key files to reflect the selector name.
Finally, we need to enable and start the dkimproxy_out by running the following commands:
mx1:~$ sudo rcctl enable dkimproxy_out
mx1:~$ sudo rcctl start dkimproxy_out
This concludes the SMTP setup for the Primary Mail Server. The other thing we will need to do is to configure Dovecot so our users can actually access their email via IMAP or POP3.
Dovecot configuration
Dovecot is one of the most popular applications handling user email retrieval. The way it’s configured by default is pretty much spot on for my setup, although I did have to tweak a few things here and there.
Instead of pasting in complete configuration files (which there are plenty of for Dovecot, and which are rather long as they are quite verbosely commented), I will list the files and changes I made against the defaults, and provide you with a quick rationale.
/etc/dovecot/dovecot.conf
Find the protocols line and enable the protocols you want to enable. In my case these are pop3, imap and lmtp.
In addition, as I’m running IPv6 on my servers as well as IPv4, I had to change the listen statement to include :: after * so Dovecot uses both address families.
# [...]
protocols = imap pop3 lmtp
# [...]
listen = *, ::
# [...]
/etc/dovecot/conf.d/10-auth.conf
The main thing here is to disable plain text authentication. Please note, that Dovecot will still permit plain text authentication if SSL/TLS is used.
# [...]
disable_plaintext_auth = yes
# [...]
/etc/dovecot/conf.d/10-mail.conf
For historical reasons, my server is storing user email in mbox. As some of the users have decades worth of email (no, really), it’s difficult to migrate them off. Because of that, dovecot needs to be configured accordingly. Also, if you’re delivering mail to users’ mailboxes directly with smtpd (using the deliver to statement), you need to make sure that both of these match.
In addition it is worth looking at the first_valid_uid and last_valid_uid statements in this file to ensure the bad guys can’t log in as daemons or system users.
# [...]
mail_location = mbox:~/mail:INBOX=/var/mail/%u
# [...]
/etc/dovecot/conf.d/10-ssl.conf
This is where you configure the SSL settings for your services.
Apparently Dovecot supports SNI, so depending on which host name a client is connecting to, Dovecot can serve the corresponding SSL certificate, however it didn’t seem to be working for me – in the end I’ve decided to use a single certificate and a single host name and just tell all my users to use that to connect to either IMAP or POP3.
I have also disabled weak ciphers and protocols, and configured Dovecot to prefer the server cipher list so that the clients can’t choose to use a weak cipher instead.
# [...]
ssl = yes
# [...]
ssl_cert = </etc/ssl/mail.example.com.crt
ssl_key = </etc/ssl/private/mail.example.com.key
# [...]
ssl_dh_parameters_length = 4096
# [...]
ssl_protocols = !SSLv2 !SSLv3
# [...]
ssl_cipher_list = ALL:!LOW:!EXP:!aNULL
# [...]
ssl_prefer_server_ciphers = yes
# [...]
/etc/dovecot/conf.d/15-lda.conf
Set the postmaster field to postmaster@example.com and hostname to mail.example.com
Adjust login resources limit for dovecot user
As per Dovecot Readme, it is a good idea to adjust the resources limit in the system for the dovecot user, otherwise you’ll run into an issue with too many open files.
In /etc/login.conf add a new section at the bottom for the dovecot user, like so:
#
# Dovecot
#

dovecot:\
        :openfiles-cur=2048:\
        :openfiles-max=4096:\
        :tc=daemon:
This increases the limit of simultaneously open files and puts dovecot process in its own login class (by default it runs in the daemon class).
Enable dovecot
Finally, to enable and start Dovecot, type the following commands:
mx1:~$ sudo rcctl enable dovecot
mx1:~$ sudo rcctl start dovecot
There are other things you can (and probably should) do with Dovecot like using the sieve plugin to give your users ability to configure mail filters on the server (so that it’s the server that moves SPAM to the Junk folder instead of the client), or to enable disk quota support which allows for graceful handling of cases where users email fills their assigned quota. I’ll leave those to you as an exercise.
Primary MX Setup Summary
This concludes the setup of the Primary Mail server mx1.example.com. We have configured the PF to redirect email coming from unknown or blacklisted sources to spamd for greylisting or tarpitting; OpenBGPD for maintaining in real-time various black and white lists for spamd; OpenSMTPD for handling incoming and outgoing email, with SSL/TLS, user authentication and various forwarding rules to ensure inbound email is evaluated and classified by SpamAssassin while outbound email is DKIM signed; SpamAssasin and spampd for mail filtering; dkimproxy_out for outbound email signing and finally Dovecot for handling delivery of email to users mailboxes and email retrieval for our users.
This should give you a fully working and very nicely configured email server to start with. There’s more we can do, however, by setting up Backup MX servers, whose main reason to be is to queue email sent to your users during the time your primary server might be offline for maintenance, or because of network issues.
You can read about this in part two of this series. The good news is that the Backup MX servers have only a subset of the configuration of the Primary one, and therefore should be much easier and quicker to deploy. Stay tuned!
Hi, this is a good tutorial, but do you see mails inbound passing on SpamAssassin port?
With this same setup I only see mails going to 10026 directly.
Hi,
I’m not sure exactly what you mean by “see mails inbound passing on SpamAssassin port”, but it’s all been working fine for me. An email sent from a remote sender to a local recipient comes in to port 25, is redirected to 127.0.0.1:10025 for spampd to pass on to SpamAssassin, and once it’s classified by SpamAssassin is returned to smtpd on 127.0.0.1:10026. Just make sure that all your forwarding / relaying is done in the right order and that all tags are being set correctly where they should in your /etc/mail/smtpd.conf.
Best Regards,
mike
Just stopping by to say thanks. After some hosting troubles I’ve been looking to try something different. OpenSMTPD was on my radar to test out, but the example configurations I had found were relatively basic or incomplete. Your write-up here is excellent — a realistic usage case that is both well documented and reasoned. It’s exactly what I needed to motivate myself to try it out. I’m looking forward to the second part.
Cheers.
Hi Joshua. Thanks for stopping by and for your feedback. The long overdue part two should be out soon!
Hello mike,
I was just looking for an example configuration of OpenSMTPD to try out, and found your post.
Let me say that your work was a pleasure to read: between the lines I have been able to see someone like me, who truly loves to design mail servers, and I’m grateful that is willing to share his work with others.
Bye.
Hey,
Thanks a lot for your comment and I’m glad you’ve found my article useful!
Best Regards,
mike
Thanks for a well written article. Looking forward to part 2!
Thank you very much for your work!
In your pf.conf in the section “# EMAIL – SMTP” you might want to just log the good guys to pflog1. Otherwise spamlogd will add all connected IPs to your , even those you redirected to spamd. I might be wrong though.
Quote:
“Spamd is then either grey listing […] or whitelist (and forward the email to OpenSMTPD to port 25, as well as updating the spamdb and the table)”
Do i understand this right? Will spamd directly forward its existing connection to OpenSMTPD? According to my understanding, it simply places an entry into , so the email will be passed through by pf in the next (3rd) attempt.
I have not been using OpebBSD grey listing for quite some years now, so i might have missed something.
Anyway, than you for this excellent writeup and the perfectly designed website.
Hi Heinrich,
Thanks a lot for your message. You’re right that spamd will actually not forward the existing connection to OpenSMTPD – my description was a not very accurate shorthand for the mechanism as you explained it. In reality, the spamd will indeed whitelist a sender, so that the email will pass through pf directly to smtpd in the next attempt. I’ve just clarified the description.
Best Regards,
mike
Hi
I’m the author and maintainer of the bgp-spamd setup. Just a quick clarification: this is _not_ done by the OpenBGPD team. While I am a member, this is something I am doing 100% on my own. OpenBSD and OpenBGPD are not participants in the bgp-spamd project.
-peter
Hi Peter,
Thanks a lot for clarifying this and I’m really sorry I didn’t get this right from the start! I have now corrected the article.
Best Regards,
mike
Hi,
is there example on how you manage users/domains with this setup? Is there a chance to have this setup with ‘virtual’ users, or something in database rather than have email address=unix user ?
Hi Amar,
I use the mapping of virtual users to unix system accounts, however it’s meant to be possible to use a database for this. Look for opensmtpd-extras-mysql as an example and look through the excellent documentation on the project webpage – https://opensmtpd.org/
I’ve followed your excellent guide, but I don’t get anything catched by spamd. I find it hard to debug spamd. On the other hand are my connections mostly ipv6. Do you have any experience in the same setup for both ipv4 and ipv6?
Hi Gunnar,
Thanks a lot for your comment! I’m glad you found the guide helpful.
My understanding is that the spamd only supports IPv4. Most likely the reason for that is that to deal with IPv6 would really require a different approach than IPv4. With IPv6 each network gets a minimum of /64, and quite often a /48 – each of those providing magnitudes more of addresses than the whole of IPv4 (the IPv4 has 2^32 possible IP addresses, not all available for use; IPv6 has 2^128 addresses, and a /64 will provide a network with 2^64 addresses, while the /48 prefix will give 2^80 addresses). With features like IPv6 Privacy Addressing, hosts can and will use randomly generated address from within their /64 or /48 prefix, and this address quite often will change every few hours. It’s therefore not practical to block a single IPv6 address like it is with an IPv4, as within a few hours that block will not be effective anymore and yet it will consume memory on your SMTP host.
My SMTP server does use dual stack, however in my case, as you can see in the config in the article, I’m passing the inbound IPv6 traffic straight to smtpd. I know I still have the likes of SpamAssassin analysing the emails coming in – the worst case scenario is that SpamAssassin will just have to work a little harder should an IPv6 host start sending me spam.
Hope that helps!
Best Regards,
mike
Did you ever think about adding a virus scanner? Not necessary ? Technical problems?
Best Regards,
Heinrich
Sorry, i should have been researching before posting. Virus detection can obviously be plugged into SpamAssassin.
-Heinrich
Hi Heinrich,
A few months after deploying OpenSMTPD with all the bits described in the article, I have added virus detection. It was easy enough, I’ve installed clamav and clamsmtp. I’ve configured clamsmtp to listen on localhost:10029 and send clean email to localhost:10030. It also connects to clamd over localhost:3310 to get it to do the actual detection.
I then changed the /etc/mail/smtpd.conf like so:
* the inbound rule first relays to 127.0.0.1:10029 (to clamav)
* all email received on port 10030 is tagged CLAMAV_IN
* all email tagged CLAMAV_IN is then sent via smtp relay to 127.0.0.1:10025 (to spamd)
The actual config part looks like so:
so in effect it’s just “stacking” those extra steps on, and “daisy-chaining” the connections, so that the flow is:
incoming email -> tcp/25 (smtpd) -> 10029 (clamsmtp_in) -> 10030 (smtpd) -> 10025 (spamd) -> 10026 (smtpd) -> lmtp
Best Regards
mike
Are there other virusscanners (sophos, kaspersky ..) which can be included as clamav is not realy a good one?
Hi Hermann,
I’m not sure, to be honest. I’ve only been using ClamAV on my system. Most of the email containing viruses is actually filtered out by the spam filters, so ClamAV has actually very little to do. Every now and then I do see a message that it has found an infected email, so it seems to work?
Regards,
mike
Hello there,
I’m a little bit lost at smtpd.conf, i truly think this conf is for 5.8version as soon i have these error:
/etc/mail/smtpd.conf:11: invalid configuration file /etc/mail/aliases.db for table aliases
warn: Table “/etc/mail/domains”: No such file or directory
/etc/mail/smtpd.conf:12: invalid configuration file /etc/mail/domains for table domains
warn: Table “/etc/mail/users”: No such file or directory
/etc/mail/smtpd.conf:13: invalid configuration file /etc/mail/users for table users
warn: Table “/etc/mail/blacklist-recipients”: No such file or directory
/etc/mail/smtpd.conf:14: invalid configuration file /etc/mail/blacklist-recipients for table blacklist-recipients
warn: Table “/etc/mail/other-relays”: No such file or directory
/etc/mail/smtpd.conf:15: invalid configuration file /etc/mail/other-relays for table other-relays
/etc/mail/smtpd.conf:52: invalid use of table “domains” as DOMAIN parameter
/etc/mail/smtpd.conf:65: invalid use of table “blacklist-recipients” as RECIPIENT parameter
Ok, i can touch every file, but for aliases.db i’m not very sure, does the files has to be touched ? for the other one i think other conf has to create these one.
Could you help me ?
BTW, i use 6.0 openbsd and i would never thank you enough for this howto ( which it seems to complicated for me )
Ok then, i answered myself when i had the balls to touch files 😀
Does some table is fill via other software interactions ? mine is empty 🙁
Hi Jonathan,
The config will work on both 5.8 and 5.9 as is, I haven’t checked whether it works with 6.0 yet.
Those tables and files which your smtpd complained about must exist before the config is loaded, but their content can be empty (at least for some of them). Here’s what they do:
– /etc/mail/aliases should be created for you when you install the OS and will include a number of system aliases, etc. To make aliases.db, you just execute `newaliases` command as user root (or, preferably, with `doas`).
– /etc/mail/domains should contain a list of domains which you want to receive email for, one domain per line. Check `man tables` to see more info on the syntax (and make sure you’re reading the correct section, as there are a few different types of tables).
– /etc/mail/users contains mappings of virtual to real users. For example, if you have a user joe, whose user name is joe and whose full name is Joe Bloggs, he might like to have email addresses like: joe.bloggs@example.com, j.bloggs@example.com, joe@example.com, joe@bloggs.com. You could add all those into /etc/mail/users, each in separate line consisting of the virtual user and real username separated by space(s), e.g. “joe.bloggs@example.com joe”
– /etc/mail/blacklist-recipients: this will contain a list of users who you don’t want to accept any email for. Can be empty.
– /etc/mail/other-relays: This file contains a list of IPv4 and IPv6 addresses of servers which you’d like to relay email for. For example, if you’re running a web server on a different machine and you’d like for the web server to be able to send email (but prefer for it to relay outgoing email via your dedicated smtp server, so for example you can control network access better on the firewall, DKIM-sign outgoing email, etc), you can include those in this file. Relaying for addresses NOT in this file will not be permitted.
Hope that helps?
Best Regards,
mike
Is it possible to limit the number of incoming connections to OpenSMTPD? Not the number of emails sent per session or the number of recipients, but the actual *connections* to the server?
Hi Leigh,
It is possible, but it’s a function of PF and not spamd or smtpd. Have a look at pf.conf(5), specifically under the “Stateful Tracking Options” header. You could have something like this (please note, I’m just typing this in here and therefore it’s not tested – use at your own risk!):
pass in quick proto tcp from any to any \
    port smtp keep state \
    (max 100, max-src-conn 10, max-src-conn-rate 10/5)
What this does is it allows traffic from anywhere to port tcp/25, with the following limits:
– maximum states (i.e. connections) at any given time should not exceed 100
– maximum connections from a single source IP should not exceed 10
– maximum connection rate from a single source should not exceed 10 in 5 seconds period
If any of those limits are exceeded, further traffic which would create a new state is dropped until existing states time out.
Note, this MAY result in temporary black holing of legitimate traffic. If your concern is that there’s too much traffic flooding your server, a better approach would be to instead of using the hard max 100 (or similar) limit, just use the max-src-conn and max-src-conn-rate parameters and in addition create a bruteforce table which the hosts exceeding your limits would be added into, e.g. like so:
table <bruteforce> persist
block in quick log from
pass in quick proto tcp from any to any \
    port smtp keep state \
    (max-src-conn 10, max-src-conn-rate 10/5, overload <bruteforce> flush global)
and add a cron job which clears the bruteforce table every 24 hours, using this command:
/sbin/pfctl -t bruteforce -T expire 86400I run this every morning, and the command removes IP addresses from the bruteforce table for which their connection counters haven’t increased in 86400 seconds (24 hours). This is a better solution, as it would block hosts that are flooding your server (i.e. suspected of attempting a DOS or a brute force attack), but still let legitimate traffic through.
Hope that helps!
Best Regards,
mike
Thanks Mike, that was very helpful. I had come to the conclusion that there was no way to restrict incoming connections using OpenSMTPD as I couldn’t find any information about it. I found hints that OpenSMTPD did it but nothing stating what the limits are or how to change them.
hi mike thank you for the detailed post
I’m wondering if it’s possible to have all spam delivered to a spam@ mailbox and not to the destination user? and where one would adjust the configuration to do so
also how would it be possible to disable remote underliverable reports? is that bad practice?
Thanks again
Hi Matt,
I haven’t had the need to do any of the things you’ve listed, so I don’t have a ready answer. Sorry!
In the configuration described in this article, after email message is scanned by SpamAssassin, it is saved to the user’s mailbox by
dovecot lmtp. Have a look at the documentation forlmtp, perhaps it can do what you need (lmtpaccepts plugins, so if it can’t save the email to aspam@, there may be an extension which can).Dovecot also supports Sieve filters, so it may be possible to write one which acts on a message marked as spam by SpamAssassin. I’d look at that.
Alternatively you can look at
procmail. It can process incoming email, and do something with it, based on filters you write. You would have to useprocmailinstead oflmtpto deliver local mail if you want this to work for the whole system (and not just a single user).What do you mean by “disable remote undeliverable reports?”
Regards,
mike
Thank you – dovecot-pigeonhole did the trick on both these questions-
steps involved were very simple; pkg_add dovecot-pigeonhole and enabling the plugin in the dovecot config.
then I just used the user level script locations to do what I need, though I abandoned delivering them to an entirely separate mailbox in favour of the generic fileinto spam folder of the users inbox
in regard to disabling remote ndr- i wasnt confident in that question but here’s the scenario that brought it around
an entry in my users file goes something like this:
user24@myowndomain.com user24@gmail.com
as a result all mail would be sent to the gmail account as I was aiming for; including the spam of course; in many cases gmail didn’t want to accept the spam and eventually that would case an NDR to the original from address, which in many cases was a fake spam address – and so these would sit in my queue and annoy me
in the end i’ve made this user a real user on the mailserver now, and i’m handling the spam with sieve so that it doesn’t attempt to send to gmail in the first place
thank you again for your time
Silly question, but dkim-genkey seems to be missing. I installed dkimproxy with no issues. Any thoughts as to why or did I miss something? Thank you for sharing your tutorial.
The dkim-genkey comes as part of the dkim-milter package.
Thank you!
Thank you for such a details howto, my only question is how do i relay outgoing mail to my isp (virginmedia) without affecting the features that you have implemented, as a lot of recipients seem to be rejecting my emails as spam.
Thanks again for some an amazing guide and very well written.
You’re very welcome!
With regards to relaying your outbound mail via your ISP, have a look at the man page for
smtpd.conf(5), specifically for therelayoption. Where you see in my config, in the OUTBOUND EMAIL CONFIGURATION section, theaccept tagged DKIM_OUTentry which ends with just a simplerelaystatement, in your config therelaywill have extra parameters, e.g.relay via secure://mx1.example.com auth <auth_smtp_out>. The <auth_smtp_out> is an auth table, which should contain the required credentials to authenticate against your upstream’s SMTP server.Great post series, thanks for publishing this. One off-topic question: what are you using to create your network & data flow diagrams in this post? They’re some of the clearest I’ve seen!
Hi John,
Thanks a lot, I’m glad you like the diagrams!
I use OmniGraffle for Mac to create all my diagrams. It’s a brilliant app, even if a little on the expensive side.
Best Regards,
mike
Something I’m curious about – you have BGP generate a file for Spamd’s blacklist and you create a PF table of the same contents? Is that redundant or am I missing other functionality?
Scott,
I thought about it for a little while too when I was setting this up initially and I don’t believe it’s redundant. Here’s my thinking:
spamddoesn’t just receive traffic, it needspfto redirect traffic to it.bgpdcreates the blacklist file (and, importantly, keeps it updated).pfuses the blacklist file to create abgp-spamdtable off it. This is then used to redirect traffic coming from any of the sources from this table tospamdspamdon the other hand uses the same table to know these are bad senders, and to continually block them.In other words, first you need to tell
pfabout the known bad senders. This is done bybgpdby creating the blacklist file, which is read in as a table and which tellspfto no matter what always redirect traffic from those bad senders tospamd. Then you need to tellspamdthat this traffic that it just received actually comes from known bad senders and so to treat it as such, and again this is done by providing it with a list of those bad senders (in the form of the blacklist file).Remember as well that
spamdmight decide someone is a good sender and to white list them – having that blacklist prevents it from doing so for the known bad senders even if they behave correctly.Hope that clarifies things a bit, or am I missing something?
Regards,
mike
Hi,
Thanks for writing such an excellent article on your email server config.,
Has anybody used the package opensmtpd-extras-table-sqlite and how did they configure servers with multiple domains e.g example.co.uk and example.com?
Best wishes, Sophie
Hi Sophie,
Thanks for your feedback, I’m glad you found this article useful.
I haven’t had an opportunity to use
opensmtpd-extras-table-sqlite, so can’t help you with this, unfortunately.. but maybe someone else can?Regards,
mike
Got errors with dovecot and “too many open files” right away ( would not even start ) on my stock standard openbsd 6.2+ (snapshot). The readme suggest is very necessary and you should probably include it in your (awesome) tutorial http://cvsweb.openbsd.org/cgi-bin/cvsweb/ports/mail/dovecot/pkg/README-server?rev=1.1
Hi,
Good catch, I’ll update the article shortly.
Thanks!
mike
My smtpd.conf has:
[…]
table blacklist-recipients file:/etc/mail/blacklist-recipients
[…]
untagged mail is sent to SpamAssassin
accept from any \
recipient ! \
for domain \
relay via smtp://127.0.0.1:10025 # send to spampd
[…]
The blacklist file exists, and is owned by _smtpd:
ls -l /etc/mail/blacklist-recipients
-rw-rw-r– 1 _smtpd _smtpd 0 Apr 2 14:41 /etc/mail/blacklist-recipients
#
But when I try to start smtpd, it complains:
smtpd
/etc/mail/smtpd.conf:66: invalid use of table “blacklist-recipients” as RECIPIENT parameter
#
I’m not sure where I went wrong following this?
Nevermind, I figured it out. The blacklist-recipients can’t be empty. I added root@mydomain.com and smtpd is happy now.
Hi Michael
Glad you got sorted and thanks for letting me know!
Best Regards,
mike
Do you know if the “listen on” for submission port can work in Ubuntu?
I’m being forced to use the IP address of my server to get it to listen to incoming mail and if I attempt to leave out the hostname and the pki bits from the listen line for port 587 (submission) – then it stops mail programs from being able to connect to the SMTP server.
Thus your incoming line slightly modified:
Listen on [IP addy] tls – works fine (though I have no idea if it is selecting one of the certs I have)
but…
Listen on [IP addy] port submission tls-require auth – is a problem as it doesn’t work, nor does egress (which I can’t get to work at all).
It seems I’m being force by Ubuntu 17 (zesty) – is forcing me to use a line like this:
Listen [IP addy] port 587 hostname domain.com tls-require pki domain.com auth
Which defeats the purpose of SNI. Is there a way to get the SNI to work with OpenSMTPD on Ubuntu? As I do have several different domains with certs.
Thanks for you excellent tutorial.
Hi,
Unfortunately I have absolutely no experience running OpenSMTPD on Ubuntu, sorry!
Best Regards,
mike
Wouldn‘ it be a more efficient setup using the spamc daemon at data stage instead of accepting mail and running Spamassasin after we said: 250 Accepted for delivery?
Hi Joe,
Probably. I’m running a small enough server though, so the load processing a small number of messages is not that much.
Would you have an example config you can share?
Thanks!
mike
Hi,
did you ever get any data from the bgpd servers? I never did and was wondering if they’re still offering that service.
Tony
Hi,
Yes, I’m receiving prefixes with bgpd from bgp-spamd project:
$ bgpctl show summ

Neighbor                   AS    MsgRcvd    MsgSent  OutQ Up/Down  State/PrfRcvd

217.31.80.170           65066      75972      51830     0 3d06h17m  28788

64.142.121.62           65066      66890      51553     0 02w0d00h  28788

$
Do the BGP sessions come up on your server?
Regards
mike
That’s what I get:
But I don’t get any addresses out of it, also checked pf-tables – they’re all empty
You actually ARE receiving addresses (in BGP called prefixes), looking at the output you sent me. You’re getting 48 ipv6 prefixes and 28839 ipv4 prefixes. You can see the details with
bgpctl show rib neighbor 64.142.121.62.You need to make sure that your PF configuration defines a persistent table named
bgp_spamd_bypassand another one namedbgp_spamdand that the /etc/bgpd.conf has configuration lines similar to:match from group “spam-bgp” community 65066:42 set pftable “bgp_spamd_bypass”
match from group “spam-bgp” community 65055:42 set pftable “bgp_spamd_bypass”
match from group “spam-bgp” community 65066:666 set pftable “bgp_spamd”
Note, the name after the
pftablekeyword has to match the respective name in the /etc/pf.conf. Normally bgpd should automatically update the pf tables according to those match statements. This is also assuming that in your /etc/bgpd.conf, the route servers you’re getting the prefixes from are defined inside a group calledbgp_spamd.Thats weird, because when I do: bgpctl show rib neighbor 64.142.121.62
I get an empty list.
flags destination gateway lpref med aspath origin
All other configurations are exactly the same and the tables in /etc/pf.conf match those configured in /etc/bgpd.conf
I’m getting the same result as Tony here —
bgpctl showlists prefixes successfully received, but I can’t actually get it to show me any of those entries, and the pftables remain empty. I tried a bunch of stuff to no avail, so have asked on openbsd-misc.I should also say — thank you so much for this guide! It’s been invaluable in understanding how to put all the pieces together.
Hi,
is there any web interface/solution available – .i.e. a virtualmin module or something like that – with which one can define autoreply messages (vacation etc.)?
Thanks and best regards
Sidney
Hi,
I’m not aware of a functionality like this implemented by OpenSMTPD. One way to achieve this is to use Procmail, however this is beyond the scope of this guide. Another, possibly easier, way is to use a mail client on a computer which is constantly on, and which implements the autoresponder function.
Perhaps Dovecot (LMTP) or Roundcube (Webmail client) can offer something that works for you. I’ve never had a need for autoresponder.
Regards
mike
As Mike mentioned, Dovecot and Roundcube can provide this functionality.
Dovecot Pigeonhole is a Sieve interpreter, and Roundcube webmail provides a GUI interface for managing Sieve rules (Settings –> Filters –> Managesieve)
Helo Mike
I read and use your article, very nice and clear, I liked so much.
I have some questions:
1st. Do you have the smtpd.conf with the new syntax?
2nd. With dovecot I had problems with auth until I read “Simple Virtual User Installation”, I have to do something with vmail account?
Thanks a lot
Hi Oscar,
Thanks a lot for your message and sorry for a delayed response. Unfortunately I haven’t yet done the migration of my SMTP server to the new OpenSMTPd and therefore I don’t have the smtpd.conf with the new syntax. Take a look at the OpenSMTPd’s creator website, https://poolp.org – I’ve seen there an example of how to migrate from the old to the new syntax.
Sorry I can’t help you with dovecot issue either – my use case is different. I only have a small handful of users on my system and they all have system accounts, so no virtual users.
Sorry I’ve not been of much help and good luck!
Best Regards,
mike
following configure is for old version, what’s the matched function for OpenBSD 6.5?
thank you very much
Accept mail sent from local server to a local account
accept from local \
for local \
deliver to lmtp “/var/dovecot/lmtp”
tagged and returned from spampd, deliver to mbox
accept tagged SPAM_IN \
for domain virtual \
deliver to lmtp “/var/dovecot/lmtp”
accept tagged SPAM_IN \
for local alias \
deliver to lmtp “/var/dovecot/lmtp”
#
(INBOUND) START HERE
#
untagged mail is sent to SpamAssassin
accept from any \
recipient ! \
for domain \
relay via smtp://127.0.0.1:10025 # send to spampd
#
OUTBOUND EMAIL CONFIGURATION
#
Listen on SMTP on loopback interface
– server name: ob62mx.in.ww-it.cn
listen on lo0
Listen in on loopback interface
– port 10028
– tag DKIM_OUT
– server name: ob62mx.in.ww-it.cn
listen on lo0 port 10028 tag DKIM_OUT
Accept mail tagged DKIM-OUT (from dkimproxy_out)
– for any
– relay
– server hostname ob62mx.in.ww-it.cn
accept tagged DKIM_OUT \
for any \
relay \
hostname ob62mx.in.ww-it.cn
#
(OUTBOUND) START HERE
#
Accept mail from local
– for any
– relay via smtp://127.0.0.1:10027
(send to dkimproxy_out)
accept from local \
for any \
relay via smtp://127.0.0.1:10027
I haven’t yet migrated fully from the older version (with older syntax) of smtpd to the one distributed as part of OpenBSD 6.4/6.5, so I can’t really give you much in terms of advice. Take a look at http://poolp.org/ – Gilles has a few articles there with some information on how to translate the configs from the old to the new syntax. Good luck!
Thank you for the quick response, thank you Michal
Easy to test if your IP is blacklisted or will have problems sending email to any of the popular hosts (before using it)?
Somewhat.
You can easily see if your host is not on any (most) of the blacklists by.. checking the blacklists. I’d recommend going to http://mxtoolbox.com/ and running tests there, it can also flag other configuration issues with your SMTP server.
In terms of delivery to popular hosts, that’s not so easy. There are some services on the internet which will run such tests for you and report on how many emails were delivered to test accounts on various email providers servers, or you can set up some test accounts and check yourself.. but it can be a bit of an uphill battle.
Some truly prime articles on this website , saved to bookmarks . Rayshell Davie Nerine
I love this tutorial)))
I want to move my mail-servers, that are hosted from a couple archlinux machines, to openbsd. Archlinux’s bloat is getting to me…
I was wondering if there is a new version for these tutorials…
The reason being is that http://bgp-spamd.net/ is shutting down…
Maybe adding rspamd to the mix.
And some optimization…
Can anyone help?
p.s
I am currently working on some ansible playbooks to deploy openbsd mail-servers…
Thanks)))
haven’t even made it thru the entire article and want to thank you for the diagrams of routes/paths the emails takes.
I was coming to understand it but this really solidified it for me.
Hi Marc,
That’s great, I’m glad you found it useful!
Please note though, this guide is a good bit out of date now. I’ve started working on an updated one, to cover the modern OpenSMTPD configuration syntax, as well as replacing some of the elements of the overall solution with more modern ones (e.g. `rspamd` instead of `SpamAssassin`, etc), but it’s going to take a while before I finish as things are quite hectic at the moment!